This post contains affiliate links. If you purchase through a link, I may earn a small commission at no extra cost to you. Full disclosure here.
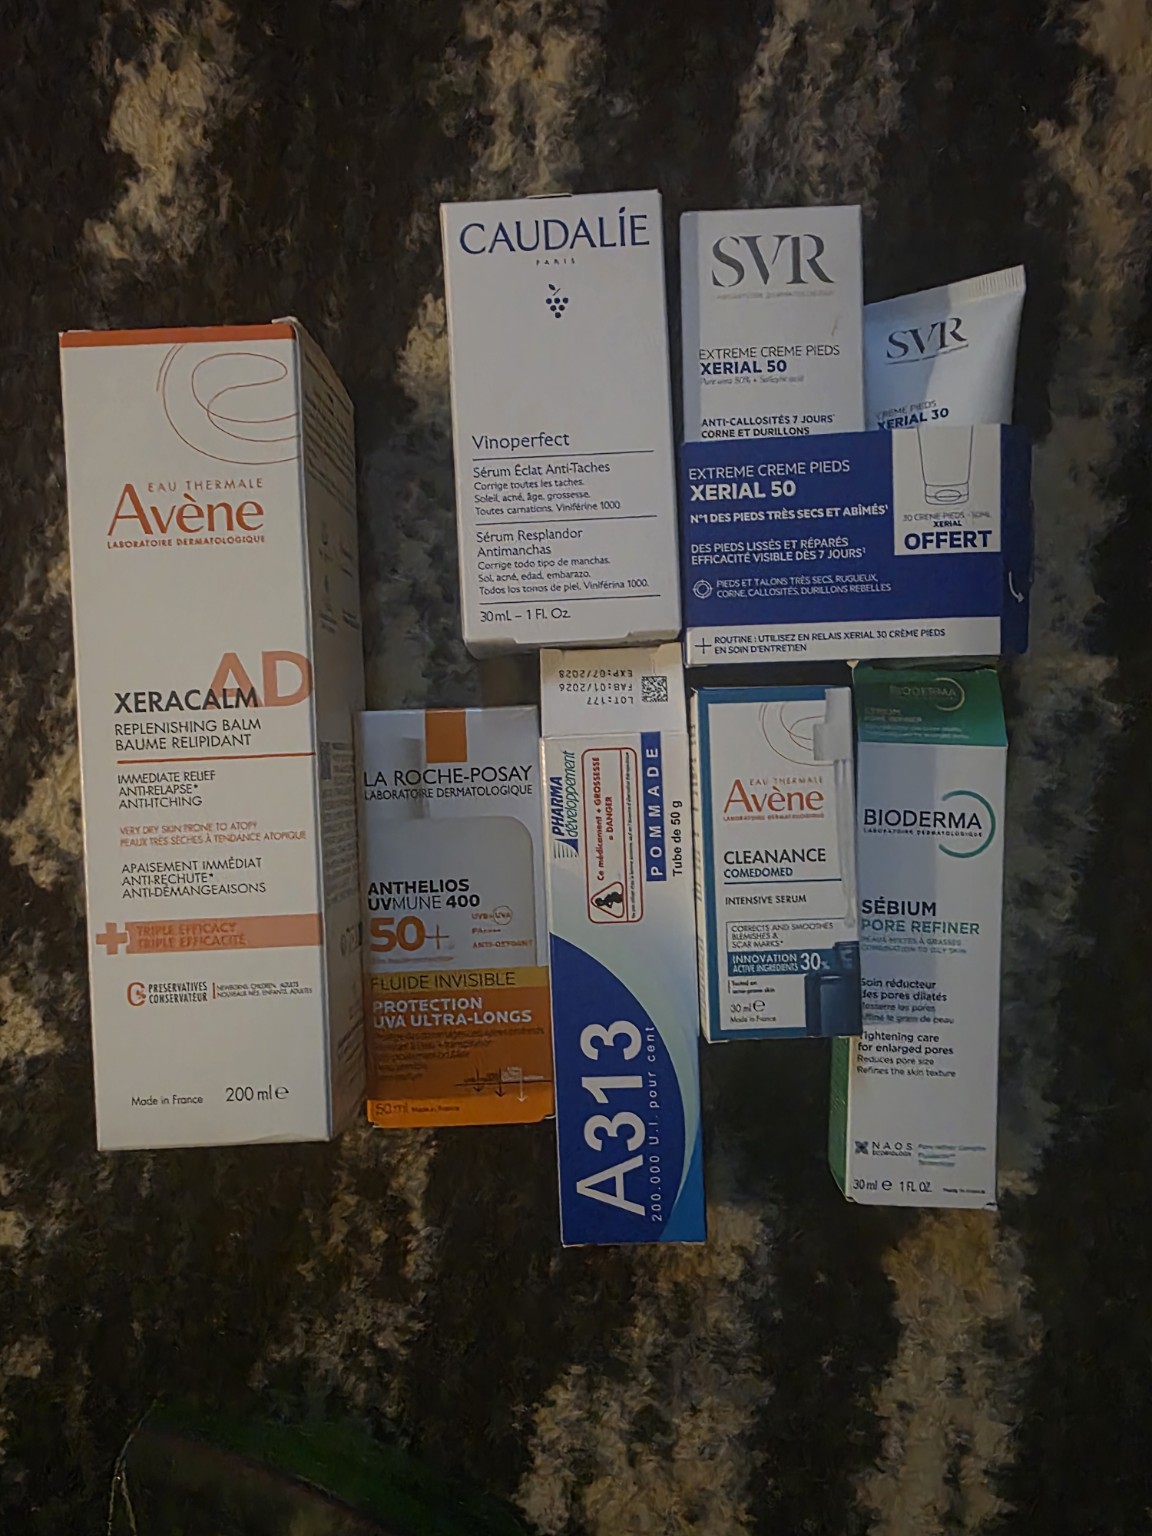
If you’re a skincare person, a French pharmacy is one of the most fun (and surprisingly practical) stops you can build into a trip. In Strasbourg I made a beeline for the Pharmacie de l’Homme de Fer, and I walked out with a whole new routine. Here’s why it’s worth the suitcase space, and how to shop one without blowing your carry-on liquid limits.
Why bother with a French pharmacy?
French pharmacies carry cult-favorite skincare and sunscreen that’s often hard to find (or much pricier) back home. The formulas tend to be elegant, well-priced, and genuinely good — the kind of thing beauty editors quietly stockpile. For me, the sunscreen alone justified the visit.
Finding it in Strasbourg
The Pharmacie de l’Homme de Fer sits right on Place de l’Homme de Fer, one of the central squares and a major tram hub, so it’s genuinely easy to fold into a day of sightseeing. You can wander the cathedral and La Petite France, then swing by here without going out of your way.
What I brought home
I picked up a whole new skincare regimen here, with the sunscreen as the star. On a hot, walking-heavy trip like this one, a lightweight, actually-pleasant-to-wear SPF isn’t a luxury — it’s the thing I reached for every single morning.
Everything I actually brought home from the Pharmacie de l’Homme de Fer.
How to shop one without a carry-on headache
A few things I’ve learned so your haul actually makes it home:
Budget the suitcase space (and a little weight allowance) before you go in — it’s easy to get carried away.
If you’re carry-on only, remember full-size liquids need to go in a checked bag, or stay under your 3.4 oz / 100 ml limit in your quart bag.
Bring a couple of TSA-approved silicone travel bottles so you can decant and keep using your favorites for the rest of the trip — they’re leak-proof and squeezable, which matters more than you’d think.
Wrap anything glass in clothing, and keep receipts in case of any customs questions on larger hauls.
Can’t get to France right now?
Plenty of French pharmacy staples have close equivalents you can track down at home, so you can build a similar routine without the plane ticket — and it’s worth keeping a set of refillable travel bottles on hand for whenever the next trip comes around.
As an Amazon Associate, I earn from qualifying purchases. See my full Affiliate Disclosure for details.
This post contains affiliate links. If you buy through them, I may earn a small commission at no extra cost to you — it helps keep this little blog running. I only recommend things I actually use.
I used to be the person still packing at midnight the night before a flight — half my closet on the bed, a cat sitting in the empty suitcase, and me completely convinced I’d forgotten something important. (I usually had.)
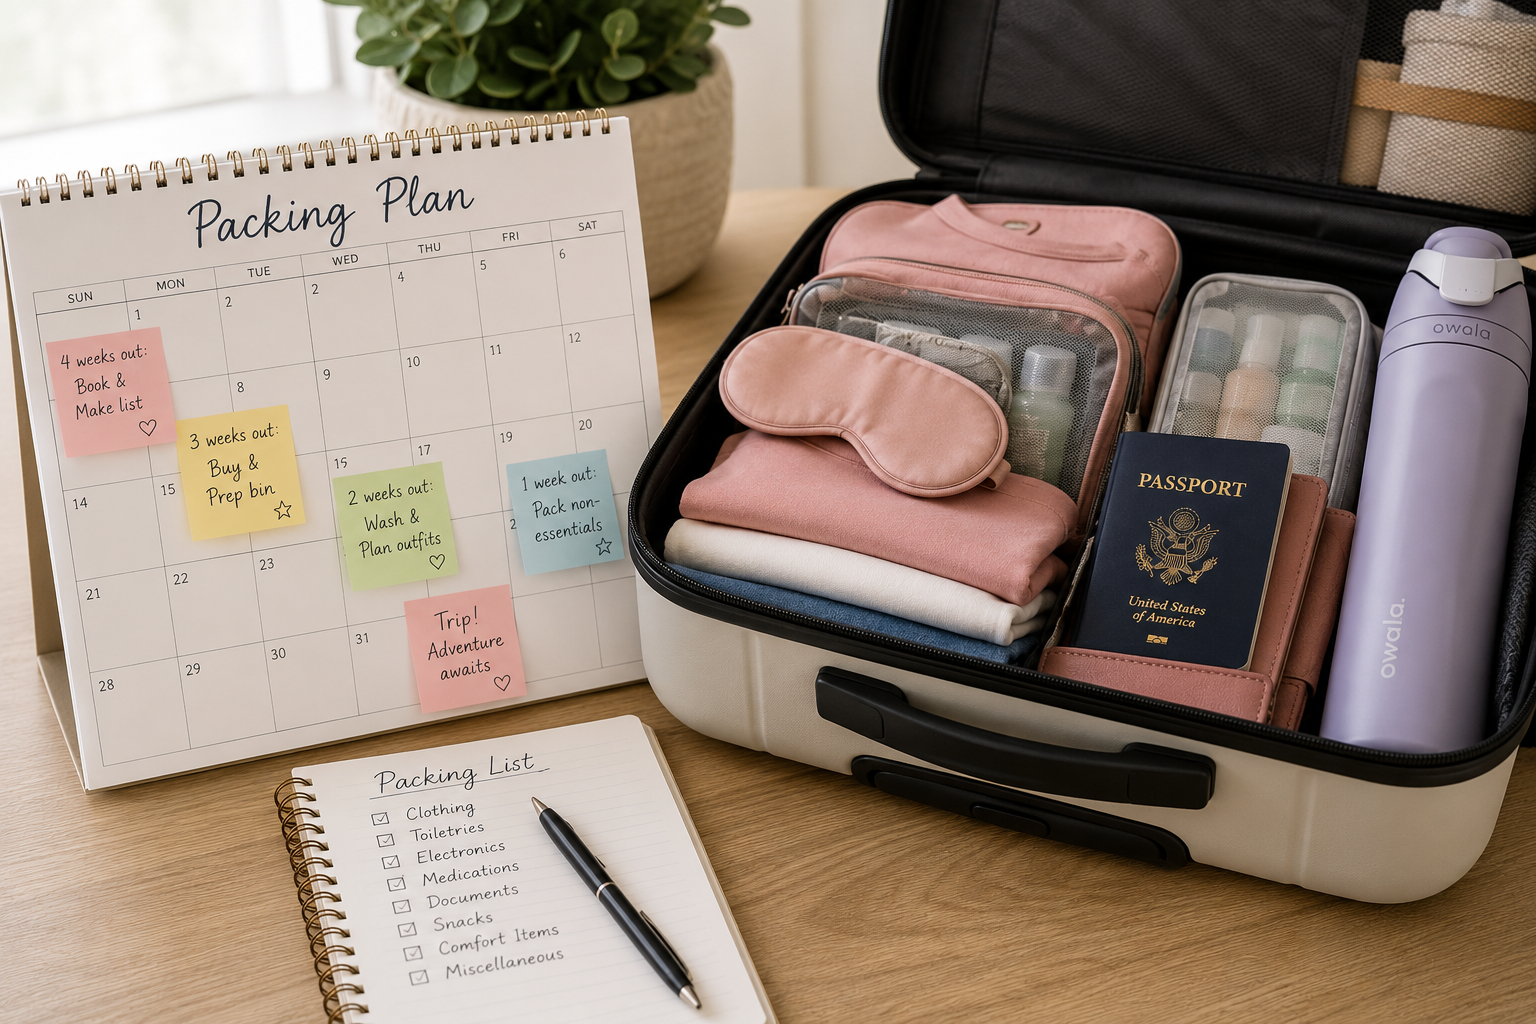
These days I start packing weeks ahead. But before you picture a suitcase sitting open in the middle of my bedroom collecting cat hair for a month — that’s not what this is. I have a slow, low-effort system that lets me pack a little at a time, spread the cost out, and show up at the airport calm instead of frazzled. Here’s exactly how the weeks before a trip actually look for me.
Four Weeks Before: The Big Stuff Should Already Be Locked In
Honestly, most of my booking happens way earlier than four weeks out — flights especially, since that’s where the good prices live, and I’ve usually grabbed those two or three months ahead. But if I’m being realistic about a minimum, everything major is booked no later than about three weeks before I leave:
Flights
Hotels
Tours and activities
Rental car
Travel insurance
By the four-week mark I want all of that done, so the countdown is about preparing — not scrambling to make decisions.
Make a Packing List (by Category, Not Chaos)
I don’t write one long random list — that’s exactly how things slip through. I break it into categories so my brain has somewhere to put each item:
Clothing
Toiletries
Electronics
Medications
Plane essentials
Camera gear
Documents
Once the categories exist, I just fill them in over the next few weeks as things occur to me.
Three Weeks Before: Start Buying What’s Missing
This is when I start ordering the little things I know I’m out of or low on:
Sunscreen
Travel-sized bottles
Electrolytes (a non-negotiable for me — more on why in a second)
A quick honest aside: I have IBS, and I don’t drink coffee, so I’ve learned the hard way not to count on whatever’s being served in the air. There was a flight to Scotland where the plane food and I did not get along, and I spent the descent regretting every decision that led me there. Now I always travel with snacks I know my stomach is fine with, plus electrolytes, so a long travel day doesn’t wreck me.
Spreading these purchases over a few weeks also just feels better. Buying everything the week before means one brutal few-hundred-dollar order all at once. Doing it gradually barely registers.
Create a Travel Bin
This is probably my favorite habit on the whole list. I grab one basket or tote and it becomes the landing spot for everything trip-related. As items arrive or turn up around the house, they go straight in:
Anything I’d otherwise “put somewhere safe” and never see again
Nothing gets scattered across three rooms. When it’s finally time to pack, it’s all in one place. A small electronics organizer lives in there too, which keeps the cable spaghetti under control.
Two Weeks Before: Laundry and Prescriptions
Wash Everything You Want to Bring
Nothing derails a packing list like realizing your favorite travel shirt is sitting damp at the bottom of the hamper. Two weeks out, I run whatever I’m planning to take through the wash so it’s clean, dry, and ready to go.
Refill Medications
This one matters more the longer you’ll be gone. I check every prescription and refill anything I’d run out of mid-trip — because sorting that out from another time zone is a headache I’ve earned once and don’t need again. A simple travel pill organizer keeps everything sorted by day.
One Week Before: Start Packing the Non-Essentials
Now the actual packing starts — but only the things I won’t touch before I leave:
Packing cubes are the thing I’d hand to past-me first. They turn a chaotic suitcase into tidy little compartments, and I can pull out a whole “category” without excavating everything else. I keep a travel laundry bag tucked in one of them for dirty clothes on the way home. And if you wind up somewhere without one — a hotel stay, say — one of the hotel laundry service bags or even a spare trash bag does the job just fine.
Double-Check Every Reservation
A week out, I go back through and confirm:
Flights
Hotels
Tours
Airport transfers and transportation
Better to catch a wrong date now than at a check-in desk.
Three Days Before: The Big Pack
This is when the suitcase really fills up:
Most of my clothing
Toiletries I won’t need in the next few days (my hanging toiletry bag makes this painless)
Electronics I’m not using daily
I also weigh the bag with a luggage scale at this point, so an overweight fee is never a surprise at the counter.
The Night Before: Almost Nothing Left
If I’ve done the earlier steps, the night before is calm. Only the daily-use stuff is still out:
Toothbrush
Phone charger
Whatever I’ll actually use in the morning
I toss those in, and I’m done. No midnight closet raid. (Jasper and Nugget are always very invested in supervising this part — Nugget in particular considers the open suitcase her personal property.)
My Travel-Morning Checklist
Right before I walk out the door, I run one final check. These are the things that actually ruin a trip if they go missing:
That airplane pouch is its own small ritual — snacks, electrolytes, headphones, a charger, and yes, an extra pair of undies. That last one sounds silly until a delay, a spill, or a rough travel day makes you deeply grateful they’re in your day bag and not in a checked suitcase somewhere over the Atlantic.
Since I don’t drink coffee, water is basically my entire hydration strategy on a travel day — so my Owala FreeSip water bottle comes with me everywhere. I fill it right after security and sip the whole flight; the flip-top straw lid means I’m not wrestling a cap open over a tray table.
I also keep an AirTag or Tile tracker in my checked bag, so if it decides to wander off, I at least know where it went.
Why I Pack Early
Packing early buys me:
Less stress
Fewer forgotten items
Time to actually replace anything missing
Better budgeting, spread over weeks instead of one panic-spend
More excitement leading up to the trip
That last one is the real payoff. Instead of dreading the night before, I get to feel the good kind of pre-trip buzz — the anticipation, not the scramble. The suitcase never lives open in my room for a month, but the trip lives happily in the back of my mind the whole time.
This post contains affiliate links. If you purchase through a link, I may earn a small commission at no extra cost to you. Full disclosure here.
There’s a specific kind of miserable that comes from being overdressed, overheated, and still trying to enjoy a vacation. I’ve been there more times than I’d like to admit — wearing an outfit I thought would look good in photos, spending the afternoon uncomfortable and distracted, and wishing I’d just packed the practical thing.
Traveling as a plus-size woman in warm weather takes some real planning. Not because it has to be complicated, but because the wrong choices show up faster — thigh chafing after twenty minutes of walking, overheating in a fabric that doesn’t breathe, hitting a wall of fatigue by 2pm because hydration got deprioritized. These aren’t aesthetic problems. They’re comfort problems, and they’re solvable.
Here’s what actually works for me.
1. Wear Lightweight Fabrics — And Mean It
Not every fabric that says “lightweight” actually breathes. Polyester blends marketed as travel-friendly can feel like wearing a plastic bag in July. What actually works in heat: linen, loose cotton, bamboo, or moisture-wicking fabrics designed for movement rather than just for looking neat.
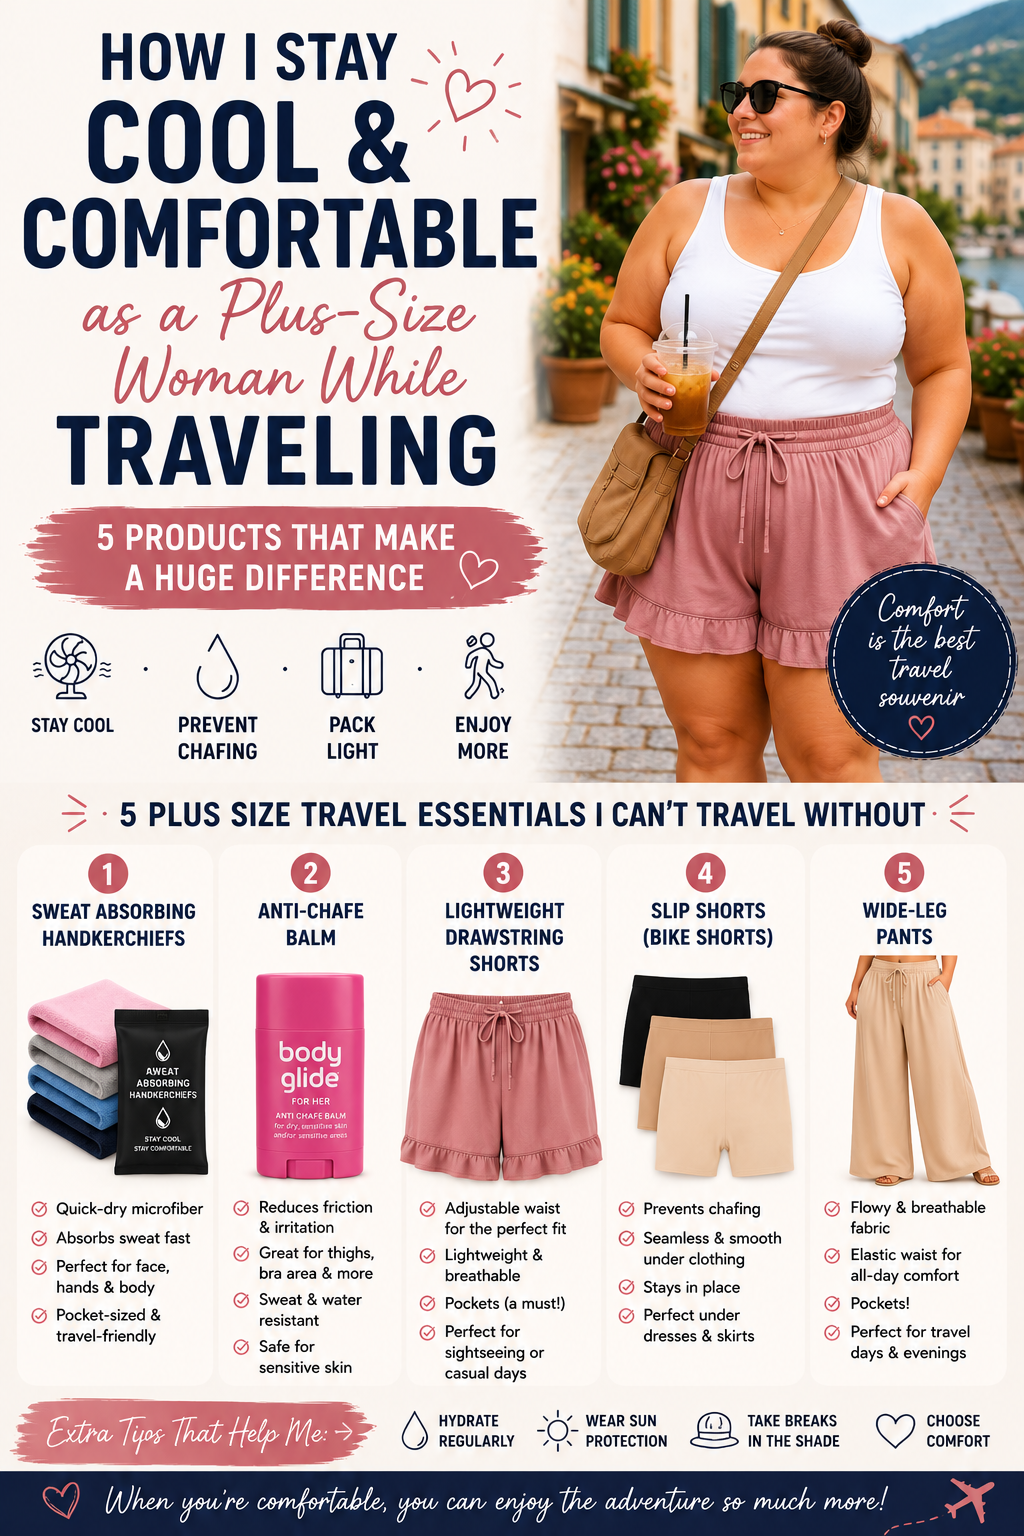
My warm-weather travel uniform has shifted almost entirely toward flowy options. The Sampeel Wide Leg Pants are a go-to — palazzo-style with elastic waist and pockets, they work for a casual sightseeing day and somehow don’t look sloppy. A linen shirt dress is the other piece I reach for constantly, because it goes from morning walk to dinner without a change and never feels heavy.
The rule I use: if I wouldn’t want to walk a mile in it at home in summer, it doesn’t come on a warm-weather trip.
2. Bring Anti-Chafe Protection — Don’t Wait Until You Need It
Thigh chafing is not a you problem. It’s a friction problem, and friction is solvable.
I keep Body Glide For Her in my bag and apply it before any day that involves significant walking. It goes on like a deodorant stick, stays put through heat and humidity, and the difference between a day with it and a day without it is not subtle. The For Her version includes added emollients, making it gentler on sensitive skin. Megababe is another option that works similarly if you prefer a different brand.
Apply it before you leave the hotel, not after the chafing starts.
3. Hydrate Before You Feel Thirsty
Thirst is a lagging indicator. By the time you feel it, you’re already behind, and in heat and humidity that gap gets worse fast.
I add a Liquid I.V. Hydration Multiplier to my water bottle at the start of every warm-weather sightseeing day. It uses a cellular transport technology that helps your body absorb water more efficiently than plain water alone — which matters more when you’re sweating continuously and replacing fluids all day.
I also carry sweat-absorbing handkerchiefs — quick-dry microfiber, pocket-sized. Blotting your face and neck with something that actually absorbs sweat is different from using a regular tissue or your shirt, and they dry fast enough to use repeatedly throughout the day.
4. Choose Breathable Shoes
Shoes are the easiest place to make a mistake you’ll feel all day.
Anything with a closed toe in real heat becomes a problem within hours. Anything that isn’t actually broken in becomes a problem faster. In warm weather I prioritize sandals with arch support or walking shoes with mesh — shoes where airflow is built into the design, not an afterthought.
If you’re going somewhere that involves cobblestones, uneven terrain, or long stretches without seating, test your shoes at home first. The comfortable-looking sandal that works for a two-hour errand is not necessarily the sandal for eight hours of walking in a foreign city.
5. Pack an Extra Shirt
On warm-weather days I pack a backup top in my day bag. This is not about being overprepared. It’s about not spending an afternoon in a damp shirt feeling self-conscious when a simple swap would fix it.
A lightweight shirt takes up almost no space. The mental relief of having the option is worth it.
6. Wear Bike Shorts or Slip Shorts Under Dresses
This goes together with the anti-chafe point, but it’s worth its own section because it changed how I approach dresses and skirts entirely.
I wear slip shorts under almost every dress now. The seamless slip shorts are the ones I’ve landed on — smooth boyshorts style, no seam lines under fitted fabrics, and they stay put through a full day of walking. For days when I want more casual comfort, the OLRIK Plus Size Shorts with the ruffle belted waist are the ones I reach for — lightweight, adjustable drawstring, actual pockets, and they don’t feel like athletic wear even though they’re completely comfortable to move in.
7. Take Afternoon Breaks — Actually Schedule Them
This one sounds obvious and is consistently underestimated.
The 1–4pm window in summer heat is brutal, and pushing through it usually means arriving at dinner exhausted and starting the next day behind. The trips where I’ve built in a midday break — back to the hotel or to a shaded café — are categorically better than the ones where I tried to maximize every hour.
The JISULIFE 3-in-1 handheld fan has become something I carry on any day with outdoor time. It’s pocket-sized, charges via USB, runs up to 19 hours, and also works as a power bank and flashlight. Personal airflow is genuinely underrated as a heat management tool. A cooling towel works on the same principle: wet it down, drape it on your neck, and the temperature difference is immediate.
8. Carry Electrolytes All Day
Water matters. Electrolytes matter more when you’re sweating continuously.
The headache and fatigue that hits mid-afternoon on hot travel days is usually less about the heat and more about electrolyte depletion. I carry Liquid I.V. packets and use them throughout the day, not just in the morning. On particularly hot days I’ll go through two.
If you’ve ever had a day where you drank plenty of water and still felt awful by afternoon — this is likely why.
9. Prioritize Sun Protection
This is the one I see people skip most often, and it costs them most visibly.
Sunburn on top of heat is miserable in a specific way — it makes everything harder, including sleep, which then compounds into the next day. I apply SPF before leaving the hotel, reapply after any significant outdoor stretch, and carry a hat for afternoons in direct sun. A cooling towel, dampened slightly and draped on your neck or face, also makes a real difference in how long you can stay comfortable before needing shade.
10. Stop Dressing for Photos and Dress for Comfort
This is the one I wish someone had told me earlier.
I spent a lot of trips in outfits I’d chosen based on how they’d look in pictures. The problem is that the discomfort of the wrong outfit affects everything — your energy, your patience, how present you can actually be. You notice the heat more. You want to stop sooner. You’re thinking about your clothes when you could be thinking about where you are.
The shift that made the biggest difference: choosing clothes for the trip I was actually taking rather than the Instagram version of it. Loose pants instead of jeans. Breathable fabric instead of a structured piece that photographs well. Shoes with actual support instead of something that looks better standing still.
You will feel better, and the photos will still be fine. I promise.
Warm-weather travel is genuinely enjoyable when your clothes and your plan are working with your body instead of against it. Getting those basics right makes everything else easier.
As an Amazon Associate, I earn from qualifying purchases. See my full Affiliate Disclosure for details.
This post contains affiliate links. If you purchase through a link, I may earn a small commission at no extra cost to you. Full disclosure here.
When I first started traveling regularly, I packed for every possible scenario.
What if it rained? What if I needed a fancy outfit? What if I suddenly wanted to work out every day? What if my hotel didn’t have basic toiletries?
The result was a suitcase I could barely lift, a sore shoulder from the airport, and a bag full of items that made the whole trip and never got touched.
Over the years I’ve gotten a lot more honest with myself about what I actually reach for. These are five things I’ve stopped packing — and I genuinely don’t miss any of them.
1. Multiple “Just In Case” Outfits
I used to add outfits to my bag for situations that existed entirely in my imagination. An extra dinner outfit in case somewhere nicer came up. An extra sightseeing outfit because what if the first one got dirty. An extra travel outfit as a backup for the backup.
None of these scenarios ever justified the space they took.
What changed it: I started being deliberate about packing pieces that actually work together instead of bringing a collection of options. The ANRABESS Keyhole Neck Travel Tee is a good example of what I mean — it looks put together enough to wear at dinner, comfortable enough to wear all day walking, and doesn’t wrinkle when packed. That’s one item doing the work of three, which is the whole idea.
BAGSMART Compression Packing Cubes also helped here, counterintuitively. When you can see exactly how much space your clothes take up — and compress them down — it becomes obvious how much you were overpacking. There’s something about packing cubes that makes the “just in case” outfits feel genuinely unnecessary.
2. Full-Size Toiletries
I convinced myself I needed my exact products in their full-size containers. My specific shampoo. My preferred conditioner. The body wash I use at home.
The reality: I used maybe a quarter of each bottle and lugged the rest through four countries.
The switch that actually worked wasn’t buying a bunch of tiny containers and decanting everything (I tried that and it’s annoying). It was getting a proper hanging toiletry bag that made travel-size products feel organized rather than chaotic. The BAGSMART Large Hanging Toiletry Bag has enough compartments that everything has a spot — and it hangs from a hook in any hotel bathroom, which means you’re not unpacking it onto a wet counter every single night.
I also stopped stressing about having my exact products everywhere. Hotel basics exist. TSA-size versions of most things exist. The toiletry bag helps make the switch feel like an upgrade rather than a compromise.
3. A Separate Pair of Pajamas for Every Night
This one sounds small but adds up fast.
Nobody is evaluating your sleepwear. Not your travel companions, not the hotel staff, not anyone. One comfortable set is genuinely enough for most trips — wash them if needed, or don’t, because you’re on vacation and no one is checking.
I used to pack pajamas almost as a reflex, one pair per three nights. Now I pack one. The space it frees up is embarrassingly useful.
4. My Regular Everyday Wallet
My everyday wallet is thick. Cards I haven’t used in months, old receipts, a gas station loyalty card, library card, backup lip balm. It’s fine at home and genuinely terrible for travel.
What I bring instead: the Coco Rossi RFID Passport Holder, which keeps my passport, two cards, and some cash all in one slim holder. RFID blocking matters more than I used to think — when you’re in crowded airports and train stations, your cards are closer to strangers than they ever are at home. Having everything in one organized place also means I’m not digging through a fat wallet at every checkout counter or border crossing.
The rule I use: if I wouldn’t need it in an emergency, it doesn’t travel with me.
5. Too Many Shoes
This was my biggest packing mistake for years, and I think it’s the most common one overall.
My former packing list: sneakers, sandals, flats, a nicer pair for evenings, and some variation of “just in case” shoes that covered whatever I’d missed. I routinely traveled with four or five pairs and wore two of them.
Now I travel with two, sometimes one, and the standard I use is simple: if a shoe isn’t comfortable enough to walk several miles in, it stays home. A nice shoe that destroys your feet by noon is not actually useful anywhere.
The REEF Neptune has become my warm-weather travel shoe because it goes from beach to casual dinner without looking like a sport sandal, and I can walk all day in it without thinking about my feet. For anything with unpredictable weather, the Sperry Saltwater Duck Boot is the one shoe that handles rain, cold, and looks decent enough for most situations — which means it earns its spot in the bag where three shoes used to go.
The Thing These Five Have in Common
None of them were bad ideas at the time. They all came from a genuinely reasonable place — wanting to be prepared, wanting to feel like myself while traveling, not wanting to be caught without something.
But over enough trips, the pattern became clear: the stuff I stressed about not having almost never came up. And the stuff I actually used was a much shorter list than I thought.
Packing less didn’t make trips harder. It made the whole thing noticeably easier — through airports, between hotels, on travel days when you’re already running on four hours of sleep and don’t need a heavy bag to deal with too.
If you’re still packing for every possible scenario, try cutting one category this trip. You probably won’t miss it.
As an Amazon Associate, I earn from qualifying purchases. See my full Affiliate Disclosure for details.
This post contains affiliate links. If you purchase through a link, I may earn a small commission at no extra cost to you. Full disclosure here.
You know the moment. You’re 35,000 feet up, the cabin is dark, and everyone around you is finally asleep. Your eyes are burning from the recycled air and your lip balm is buried somewhere at the bottom of your bag. Rummaging through it while the whole cabin is quiet is a lot.
That’s the moment that convinced me to start keeping a dedicated pouch.
The idea is simple: everything you’ll actually use during a flight lives in one small bag that fits in the seat pocket or sits in your lap. You pull it out when you board. Everything else stays in your bag.
I’ve been refining mine for a few years. Here’s what’s in it now, and honestly, why each thing is worth the space.
The Comfort Items You’ll Actually Reach For
These are the things that go from “optional” to “essential” the moment you need them and don’t have them.
Hydration — Airplane cabins run at humidity levels well below what your body is used to, which means you land feeling drained before the trip even starts. I’ve been adding Liquid I.V. Hydration Multiplier to my water bottle right after boarding. One packet in a full water bottle and you’re actually hydrating rather than just drinking — it uses cellular transport technology to deliver water more efficiently than plain water alone. The Concord Grape flavor is surprisingly good and doesn’t taste artificial.
Eye drops — If you wear contacts or spend the flight staring at a screen (guilty), dry cabin air hits your eyes fast. TheraTears Dry Eye Therapy drops are my go-to. They’re preservative-free, which matters if you’re using them more than once, and they actually feel like relief rather than just moisture. One small bottle takes up almost no space.
Motion sickness — I don’t always need these, but turbulence is unpredictable — and buses, ferries, and mountain switchbacks definitely are. The MQ Motion Sickness Patches go behind the ear, are non-drowsy, and last up to 72 hours, which means one patch can cover your flight, an overnight transfer, and a bumpy boat ride the next day. Much easier than tracking a pill schedule during travel.
Pain reliever, allergy medication, and any prescriptions — I keep small amounts in my pouch and always keep prescriptions in my personal item, never in checked luggage. A few ibuprofen and a dose of antihistamine have saved more trips than I can count.
The Electronics That Actually Pull Their Weight
Headphones — This is non-negotiable for me, and after too many years of buying cheaper pairs that cut out mid-flight, I finally invested in the Bose QuietComfort Headphones. The active noise cancellation alone is worth it — engine noise disappears, which makes sleeping, watching anything, or just sitting quietly an entirely different experience. They charge via USB-C, run up to 24 hours, and fold flat enough to live in the pouch without taking over it. If you fly regularly and you’re on the fence, this is the upgrade that actually changes how travel feels.
Portable charger — Not every seat has a working outlet, and even when they do, you may not always have a long enough cord. I switched to the VEGER 5000mAh USB-C Power Bank because it charges at 20W — fast enough to actually matter — and it’s genuinely small, about the size of a deck of cards. 5000mAh gets most phones to 100% once or close to twice. It’s enough for a domestic flight and a layover without feeling like you’re carrying a brick.
Short charging cable — A two-foot cable is enough and avoids the tangle situation entirely. I keep one coiled with my charger.
Skin & Personal Care (The Stuff I Used to Skip and Now Never Do)
Cabin air is rough on skin. Between the dryness, recycled air, and the fact that you’re touching surfaces and then touching your face more than you realize, travel days tend to show up on your skin within 24 hours.
The item that actually changed this for me: Magic Molecule Hypochlorous Acid Spray. It sounds clinical, but hypochlorous acid is naturally produced by your immune system and is genuinely gentle — it calms irritation, helps with breakout-prone skin, and works on eczema and rashes too. I spray it on after settling in, after touching communal surfaces, and before applying any moisturizer mid-flight. It’s TSA-compliant and one of those finds I now can’t imagine traveling without.
Lip balm — Cabin air dries your lips faster than almost anything else. Keep one accessible, not buried.
Disinfecting wipes — I use one on the tray table, armrests, and seatbelt buckle before settling in.
Hand sanitizer — After security, before snacks, after the lavatory. Travel days involve a lot of shared surfaces.
Travel toothbrush and toothpaste — Essential for overnight flights and long layovers. Brushing before landing makes an outsized difference in how you feel when you arrive.
Hair tie — You’ll think you don’t need it until you do.
Snacks That Actually Hold You Over
Travel delays are real. Airport food is expensive and not always available when you want it. I keep one or two snacks in the pouch so I’m never stuck and hungry.
My current go-to is BUILT Bar Puff Protein Bars. They have 15–17g of protein with collagen, are gluten free, and — this matters — they actually taste good. The texture is lighter than a standard dense protein bar, which makes them easier to eat when you’re not particularly hungry but need to eat something. The variety pack means you’re not stuck eating the same flavor every trip.
Trail mix is my backup because it doesn’t melt, crush, or expire fast. Electrolyte gummies are worth tossing in if you’re prone to travel fatigue.
Sleep Essentials
Eye mask — Especially helpful on red-eyes. I like the contoured kind that doesn’t press directly against your eyes.
Earplugs — A lightweight backup for when headphones run out of battery.
Compression socks — I keep these at the top of my bag rather than in the pouch itself and put them on right after boarding on longer flights. Your legs will thank you on landing.
Documents
I keep a small flat pocket at the back of the pouch for: passport (international), boarding pass backup, and a pen — still surprisingly necessary for customs forms.
For Long-Haul Flights, I Add:
A small moisturizer or face oil to apply mid-flight
Face mist
Travel-sized deodorant
Mini lint roller
Empty reusable water bottle
N95 or preferred face mask
What Makes a Good Airplane Pouch
The pouch itself matters more than I initially thought. You want one that opens fully flat so you can see everything, has a bright-colored interior, has a sturdy zipper that opens one-handed, and is slim enough to fit in a seat back pocket or sit on your lap without becoming bulky.
The goal is simple: once you’re in your seat, you pull out one pouch, set it on your lap or in the seat pocket, and you have everything you’ll need for the next several hours. No rummaging. No standing up. No waking up the person in the aisle seat.
It’s a small habit that makes travel noticeably less stressful — and once you’ve done a few flights with one, you’ll wonder how you managed without it.
As an Amazon Associate, I earn from qualifying purchases. See my full Affiliate Disclosure for details.
This post contains affiliate links. If you purchase through a link, I may earn a small commission at no extra cost to you. Full disclosure here.
After spending hours comparing travel backpacks for an upcoming Europe trip, I realized something surprising: the “best” travel backpack isn’t necessarily the most expensive one. The right choice depends on how you travel, what you pack, and what annoys you most while you’re on the road.
Before adding another backpack to your cart, here are the most important factors to consider.
1. Start With How You Actually Travel
The first question isn’t which backpack is best. It’s how you travel.
Do you travel with a rolling carry-on?
Are you trying to travel with only a backpack?
Will the backpack be your personal item?
Are you a frequent traveler or occasional vacationer?
A backpack that works perfectly for a digital nomad may be completely wrong for someone taking one or two vacations per year. Worth thinking through before you buy.
2. Understand Personal Item vs. Carry-On Backpacks
Many travel backpacks are marketed as “personal item approved,” but size matters.
Personal item backpacks typically range from 20–30 liters and are designed to fit under an airplane seat. The WATERFLY Crossbody Sling Bag is a good example — compact, easy to grab from under the seat, and great for day use at your destination.
Carry-on travel backpacks often range from 35–45 liters and may need to go in the overhead bin. The BAGSMART 35L Travel Backpack sits right at this range — huge capacity, detachable fanny pack, and it fits both overhead and under seat depending on how you pack it.
If you’re traveling with a rolling suitcase, you may not need a giant backpack. A smaller personal item often provides easier airport navigation and in-flight access.
3. Think About Access During the Flight
One of the most overlooked factors is how easy it is to access your belongings while seated on a plane.
Quick-access pockets
Top-loading compartments
Water bottle pockets
Front organizational pockets
The last thing you want is to completely unpack your bag just to grab your headphones or lip balm. Look for a bag where your most-reached-for items — medication, earbuds, charger — have a dedicated spot you can get to without moving everything else.
4. Decide How Much Organization You Need
Some travelers love a simple backpack with one large compartment. Others want tech pockets, passport pockets, charger storage, pen loops, and dedicated compartments for everything. Neither is wrong.
If you’ve ever found yourself thinking “where did I put that?” at airport security, you’ll probably appreciate a more organized travel backpack. The Volher Anti-Theft Laptop Backpack is worth a look for work travel — I’ve found it a genuinely great work bag. Just know that for longer trips the layout and deep pockets can get quite bulky, so it works best when you’re packing light or using it as a day bag rather than your main luggage.
Packing cubes can completely change how a backpack feels — and whether it feels organized or chaotic.
Backpacks with large open compartments often work beautifully with compression packing cubes. The BAGSMART Compression Packing Cubes are what changed how I travel — real compression, mesh top so you can see what’s inside, durable zippers, and four sizes that fit almost any bag configuration.
More structured backpacks may already provide enough organization that cubes become less important. Before buying a new backpack, ask yourself whether better packing cubes could solve your organization problems for less money.
6. Pay Attention to Comfort
A backpack can look amazing online and feel terrible after an hour of walking.
Padded shoulder straps
Sternum straps
Breathable back panels
Adjustable fit
This becomes even more important if you’re traveling through airports, train stations, or cities where you’ll be carrying your bag for extended periods. A bag that feels fine in a store or in your living room may be a completely different experience after an hour through Charles de Gaulle.
7. Beware of Overpacking
Expandable backpacks sound great in theory. However, more space often encourages more packing.
Before choosing the largest option, ask yourself: do you actually need more capacity, or do you need better organization? Many travelers find that a smaller backpack forces smarter packing decisions — and those decisions make the whole trip easier.
8. Think About Your Return Flight
It’s easy to focus on the outbound trip. Don’t forget the return.
Will you bring home souvenirs, clothing purchases, gifts, or snacks? Expandable backpacks can be particularly useful for travelers who tend to return with more than they left with. If that’s you, factor that into your size decision — not just what you’re bringing, but what you’ll be bringing back.
9. Don’t Ignore Weight
An empty backpack that weighs several pounds before you pack it can become exhausting by day three of a trip.
When comparing bags, look at the empty weight, material durability, and structural components. Sometimes the lighter bag provides a significantly better travel experience — especially on trips where you’re moving frequently between cities or carrying the bag all day.
10. Be Honest About How Often You’ll Use It
The best backpack isn’t always the premium option. If you travel once or twice a year, a budget-friendly backpack may be all you need. If you travel frequently, spending more on comfort, durability, and organization may be genuinely worthwhile.
The key is buying the backpack you’ll actually use, not the backpack that looks best in a YouTube review.
Final Thoughts
The perfect travel backpack doesn’t exist. Instead, focus on finding the backpack that solves your biggest travel frustrations.
For some travelers, that’s maximizing space. For others, it’s staying organized. And for many of us, it’s simply finding a bag that makes navigating airports, trains, and long travel days a little easier.
Before you buy, think about how you travel — not how influencers travel — and you’ll be much more likely to find a backpack you’ll love using for years.
As an Amazon Associate, I earn from qualifying purchases. See my full Affiliate Disclosure for details.
This post contains affiliate links. If you purchase through a link, I may earn a small commission at no extra cost to you. Full disclosure here. Updated post-trip with what I actually packed, what worked, and the one packing curveball I did not see coming.
Here’s what I did: twelve days across five countries, with a carry-on suitcase only.
Belgium. Luxembourg. Germany. France. Switzerland. One bag. No checked luggage, no checked fees, no waiting at baggage claim after an overnight transatlantic flight when I landed in the morning and desperately wanted to get to the hotel and lie down.
I’ve been working toward carry-on only travel for a while now. The packing cubes made it feel possible. The right bag made it feel achievable. This trip was the real test: longer than I’d done carry-on before, more weather variability than a short weekend, and enough moving between cities that I couldn’t afford to be dragging an overweight bag through cobblestone streets in July heat.
This is what I actually packed, why it earned its spot, and what I left at home on purpose — plus the one packing curveball I didn’t see coming. Full post-trip verdict below.
🗺️ The Trip
Twelve days, five countries, all in summer — a mix of big cities, small towns, and one mountain day, moving every few days rather than living out of a suitcase in one spot. That pacing helps a lot with carry-on only, because you’re not fully unpacking and repacking at every stop.
The full day-by-day itinerary — where we went, in what order, and how we got between stops — is getting its own post. This one’s just about what went in the bag.
🎒 The Bag Situation
I ended up sticking with the same BAGSMART 35L Travel Backpack I used for Oregon, instead of upgrading to something new — and I’m glad I did. It held everything I needed for twelve days across five countries, the pockets made grabbing quick-need items (passport, phone, chargers) genuinely easy, and it was simple to manage moving between cities. It did get a little warm against my back at one point, but nothing dramatic — and I run hot regardless of what I’m wearing, so I wouldn’t hold that against the bag.
Confession: I packed everything to true carry-on spec — I confirmed it all fit in my actual carry-on before I left. But two weeks before the trip, that carry-on cracked from years of use, and I didn’t have time to find a replacement I loved (I’ve got my eye on a Samsonite for next time). So I traveled with a bag one size up, out of necessity, not choice. Everything on this list still fits in a genuine carry-on — I checked.
Inside the bag: the same BAGSMART Compression Packing Cubes I’ve used on every trip since I found them. Compression cubes are genuinely the single biggest reason carry-on only was achievable for a trip this long — not because they create space from nothing, but because they forced me to be intentional about what went in, and they kept everything from becoming one large tangled pile. The BAGSMART Large Hanging Toiletry Bag handled everything in the bathroom, hung from any hook, and meant I never had a shampoo bottle loose in my bag.
👚 What I Actually Packed
July in this part of Europe was warm — high 70s to low 80s — with enough afternoon rain that waterproofing mattered. The activities were almost entirely city walking, which meant cobblestones, uneven surfaces, and a lot of standing. One mountain (Rigi), which added a layer consideration for elevation. No beach. No formal events.
Clothing
Here’s the actual list, no rounding down: 4 pairs of shorts, 1 long skirt, 1 short skirt, 2 pairs of flowy pants (black and tan), 6 t-shirts (2 black, 2 white, 1 grey, 1 maroon), 1 tank top, 4 bras, 6 pairs of socks, 1 pair of pajamas, and 14 pairs of underwear — yes, fourteen. We do what we must. I did one load of laundry mid-trip, Tide packets in the sink, mainly to refresh the t-shirts.
All of that still left room on the way back for souvenirs — I bought two shirts and packed them straight into the backpack — plus my French pharmacy haul (its own post, coming soon) and a stash of chocolate. Everything fit without a fight.
Shoes
Shoes are the hardest part of packing for Europe, and the cobblestone streets will destroy anything without proper support. I packed two pairs and wore a third: the Skechers GO Walk Flex slip-in sandals and the REEF Neptune went in the bag, and the New Balance 1080 v15 went on my feet to the airport. Wearing a pair on the plane instead of packing it is still non-negotiable with carry-on only travel.
The split wasn’t quite what I expected, though. The sandals did more work than either sneaker — they were simply more comfortable for the sheer amount of walking, and they’re a cute enough open-toed shoe that I never felt underdressed in them. The sneakers came out on cooler days and for the mountain. Worth remembering for next time: pack the shoe you’ll actually reach for, not just the one that photographs best.
Day Bag
The Baggallini Securtex Anti-Theft Daytripper Sling came everywhere as my day-use bag — same as it did in Seattle. It held what I actually needed for a day of city walking: phone, wallet, passport holder, earbuds, lip balm, one snack. Didn’t require thinking about. Didn’t pull on one shoulder. Fit under a seat on a train without blocking the aisle.
Rain
The SY COMPACT Travel Umbrella came along, and it earned its space — European summer weather was genuinely unpredictable, and I wasn’t caught out without one this time.
🛩️ The Flight Kit
Transatlantic overnight flight. I do not sleep well on planes. I wore a sweater, a t-shirt, and joggers for the flight over — comfortable enough to sleep in, and easy to wash and re-wear for the flight home. Here’s what else was in my personal item for the flight specifically:
Bose QuietComfort Earbuds — the single best investment I’ve made for long-haul travel. Active noise cancellation changes everything about a plane cabin.
SARISUN Airplane Head Strap Pillow — I cannot sleep sitting upright without something holding my head. This is that thing. Worth every bit of the space it takes.
Albatross Sleep Eye Mask — for blocking the light when the person next to me turns on their overhead at 3am.
Five countries meant five opportunities to need my passport in a hurry. Everything document-related traveled in the Coco Rossi RFID Passport Holder, which fit into the Baggallini sling and meant I always knew exactly where it was. Anikathy Luggage Tags on the bag, Life360 Tile Slim inside it. The bag never got lost — carry-on only makes that substantially less likely — but I would have had a way to find it.
📝 What I Actually Left at Home
This is the part of carry-on only packing that nobody talks about honestly enough — and all of it held up.
The “just in case” outfit. I packed for the trip I was taking, not for an imaginary nicer version of it. No specific occasion on the itinerary meant no outfit for it — and I didn’t miss it once.
Full-size anything. Every toiletry was travel-size or solid-form. The hanging toiletry bag never got heavy enough to strain the hook.
The second pair of pajamas. One set was genuinely enough — I shower before bed, so I never needed a backup. Though in hindsight, I could have fit a second pair, or done a laundry run first thing in the morning if I’d wanted the option.
Books. Kindle app exists. I didn’t carry three paperbacks across Switzerland just in case I wanted options.
Anything I could buy there. Forgot something? If it cost less than the airline’s checked bag fee, I bought it at a pharmacy instead — more on that haul soon.
✅ The Verdict
Carry-on only worked — even with a last-minute bag swap I didn’t plan for. Everything on this list fit, nothing felt like a sacrifice, and the one hiccup (RIP, old carry-on) turned into a lesson for next time rather than a disaster. The full day-by-day breakdown of where we went is coming in its own post.
This post contains affiliate links. If you purchase through a link, I may earn a small commission at no extra cost to you. I only recommend products I genuinely use and believe in. Full disclosure here.
I was a packing cube skeptic for years.
Every time I saw them in travel blogs I thought the same thing: that looks like a lot of extra stuff to manage, and I already don’t have enough room. I’d been folding and cramming clothes into suitcases my whole life and it worked fine. Why add another layer of organization to something that was already a hassle?
Then I started trying to pack carry-on only for longer trips — and everything changed. Without packing cubes, carry-on only for ten days felt impossible. With them, it became something I actually look forward to figuring out.
If you’re on the fence, this is my honest take on what makes a packing cube worth buying, what I actually use, and how I pack them for real trips.
Full disclosure on the image above: it’s not a photo of my actual packing cubes. Mine are grey, perpetually a little overstuffed, and have never once looked that composed — but they work exactly the same.
What Makes a Packing Cube Actually Worth It
Not all packing cubes are equal. I’ve tried a few versions over the years, and the difference between a good set and a mediocre one comes down to three things:
Real compression. Some cubes are just fabric boxes that keep things tidy. Good compression cubes have a second zipper that actually squeezes the air out and reduces volume. That second zipper is the whole point if you’re trying to fit more into a smaller bag.
Durable zippers. The compression zipper takes a lot of force. Cheap cubes split or jam after a few trips. You want something that holds under pressure — literally.
A useful size mix. A set with only one or two sizes forces you to improvise. Look for a set that gives you large, medium, small, and ideally a flat bag or shoe bag so you have a place for everything.
The Set I Use: BAGSMART Compression Packing Cubes
Quick note before I start gushing: this isn’t sponsored. BAGSMART has no idea who I am. I bought these with my own money, they worked, and I kept using them. That’s the entire story.
These are the ones I reach for every single time. I’ve used them for Oregon, for Scotland, and they’re coming with me on my upcoming ten-day Europe trip. They’ve held up through overhead bins, rental car trunks, and more than a few cobblestone detours.
The compression zipper actually works. Roll your clothes, load the cube, zip the compression side, and you’ll be genuinely surprised at how flat it gets. I’ve fit what used to take a full carry-on into one large cube and a medium.
Mesh top panel. You can see exactly what’s in each cube without opening it. This sounds minor until you’re standing in a hotel room at 6am trying not to wake anyone up and you just need to find your socks.
The set includes a shoe bag. This is the unsung hero of the whole set. Your shoes go into their own sealed bag instead of sitting directly on top of your clean clothes, which is exactly where shoes do not belong. I never thought about it much until I had one, and now I’d be annoyed to travel without it.
Four sizes in one set. Large, medium, small, and the shoe bag. That covers clothing, layers, underwear, socks, and shoes in one system.
They’re lightweight. Packing cubes that weigh a lot defeat the purpose. These don’t add meaningful weight to your bag.
The zippers have held up. Multiple trips, aggressive compression, rough handling. No issues.
Being honest about the one thing
If you’re already a very light packer traveling with just four or five items, these might feel like overkill. But if you’ve ever dumped out your entire bag on a hotel bed looking for one thing — and I have, more times than I’d like to admit — packing cubes solve that problem permanently. Everything has a place and you always know where it is.
How I Pack Them for Carry-On Only Travel
For a ten-day Europe trip packed into a single carry-on, here’s roughly how I load each cube:
Large cube: 3–4 tops, 1 lightweight layer or cardigan
Medium cube: 2 bottoms (pants or skirts), 1 dress if bringing one
Small cube: underwear, regular socks, a sleep layer
Shoe bag: shoes, kept well away from anything clean
Separate: toiletry bag goes outside the cubes (more below)
The key is rolling your clothes before loading each cube rather than folding flat. Rolling lets you compress more effectively and you get fewer wrinkles too. Once everything is in, zip the main zipper, then work the compression zipper from one end to the other. You’ll feel the difference.
I also try to pack each cube with a theme so unpacking at the destination takes about two minutes. Everything for my top half in one cube, everything for my bottom half in another. When I get to the hotel I pull out the cube I need and leave the others in my bag.
The small cube trick I use on every flight
This one has saved me more than once. I pack a single complete outfit into one of the smallest cubes and keep it in my backpack rather than my carry-on. One top, one bottom, socks, and at least two pairs of underwear — because welp, we have to be prepared.
It takes up almost no room once it’s compressed, and if my bag and I ever get separated, I still have a full change of clothes on me. It’s almost no effort for a genuinely outsized amount of peace of mind.
And the trip home
Here’s the use nobody mentions: on the way home, the cubes become dirty laundry containers. Everything I’ve worn gets zipped into one cube and compressed flat, which keeps it completely separate from whatever is still clean. No plastic bags, no mystery pile at the bottom of my suitcase, and unpacking at home means carrying one cube straight to the laundry room.
It’s the least glamorous thing they do and possibly my favorite.
What Pairs Well With These Cubes
Packing cubes work best as part of a system. Here’s what I use alongside them:
BAGSMART Large Hanging Toiletry Bag
Your liquids and toiletries stay completely separate from your clothing cubes. This bag has a hanging hook for hotel bathrooms, holds full-sized containers, and is water-resistant inside — which matters when a shampoo bottle decides to leak at 30,000 feet. I’ve recommended this one to everyone who’s asked me what I use.
This is the bag I put everything into. The cubes fit cleanly, there’s a dedicated laptop sleeve and a detachable fanny pack for day trips — which I used constantly in Oregon. The capacity is generous without being heavy, and it’s genuinely comfortable on a full travel day.
Note: I’m upgrading to the Bagsmart Blast Pro for my Europe trip and will update this post with a full comparison of both bags once I’ve used it on the ground.
Packing cubes are worth it — but only if you get ones that actually compress. The BAGSMART set earns its space in my bag on every trip, and that’s the standard I hold everything to. If something isn’t genuinely making my travel easier, it doesn’t come with me.
If you’re new to carry-on only travel and not sure where to start, this is the place. Get the cubes, get the toiletry bag, and give yourself one practice pack before your trip. You’ll figure out your system faster than you think.